Scan stations
20 real ultrasound and bronchoscopy images with the labels covered, as at a procedure station. Name each structure aloud and say why it matters, then press Show.
Nerve blocks and neuraxial
Adductor canal
Here is your image. Point to and name each structure, then say why it matters.
Linear high-frequency probe transverse at mid-thigh, about 10–12 cm above and 3–4 cm medial to the patella midpoint.
Transverse mid-thigh; lateral on the left, medial on the right
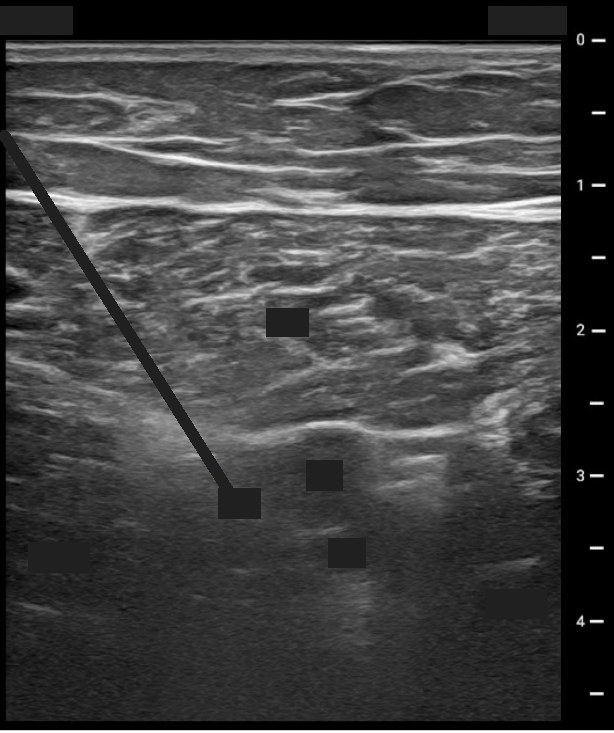 , open the image full size
Show the answerHide the answer
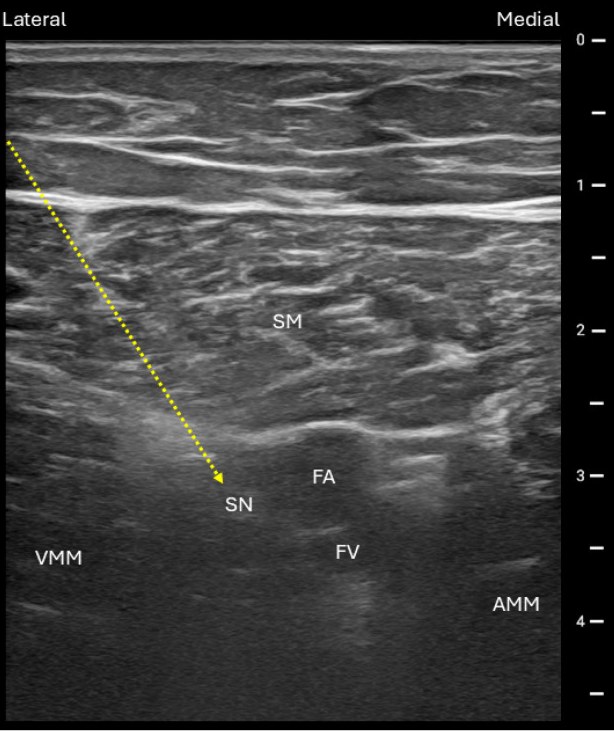 , open the image full size
Labels SM sartorius · FA femoral artery · FV femoral vein · SN saphenous nerve · VMM vastus medialis · AMM adductor magnus
- This lip-shaped muscle on top is sartorius.
- Under it, confirmed with Doppler, is the femoral artery.
- Lateral is vastus medialis and medial is adductor longus.
- This double bright line is the vastoadductor membrane, the roof I must get under.
- The saphenous nerve is often invisible, so I place drug just lateral to the artery.
- Sartorius Lip-shaped roof muscle with bright borders above the artery
- Superficial femoral artery Doppler landmark at mid-thigh; nerve usually beside it
- Vastus medialis Lateral wall of the canal
- Adductor longus Medial wall of the canal
- Vastoadductor membrane Double-contour roof; injectate must go beneath it
- Saphenous nerve Often unseen; usually lateral to the artery: the target
Checked against: Faust · Barash 9e · Miller 10e
Image: Ramanujam V et al., Advances in Peripheral Nerve Block Techniques and Clinical Strategies for Their Implementation Following Total Knee Arthroplasty: A Narrative Review (J Clin Med 2026; doi:10.3390/jcm15051957), Figure 10, CC BY 4.0. Changes: Cropped to the sonogram, depth scale and Lateral/Medial header, dropping the 'Transducer' caption and frame; in the question image the SM, FA, FV, SN, VMM, AMM labels, the Lateral/Medial words and the yellow dotted needle arrow are covered.
Axillary brachial plexus
Here is your image. Point to and name each structure, then say why it matters.
Linear 10–15 MHz probe across the arm at the axillary pulse, at right angles to the front axillary fold.
Transverse short axis across the arm at the axilla, skin at top; artery centre-right with the vein to its right, musculocutaneous nerve to the left
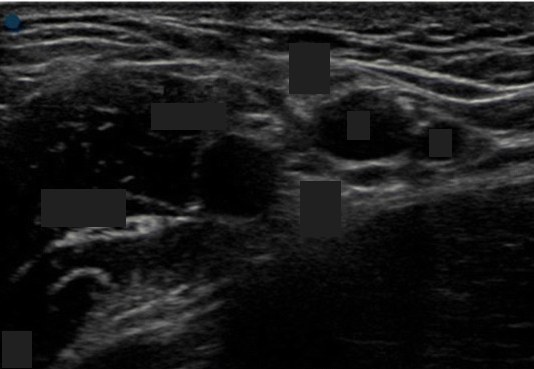 , open the image full size
Show the answerHide the answer
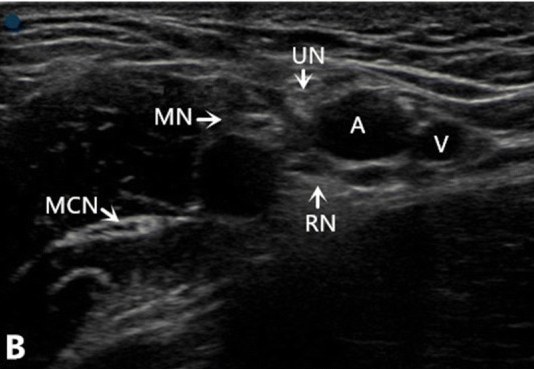 , open the image full size
Labels MN median · UN ulnar · RN radial · MCN musculocutaneous nerve · A axillary artery · V axillary vein
- This dark round circle in the middle is the axillary artery.
- Between the artery and biceps is the median nerve.
- Toward the inside and near the surface is the ulnar nerve.
- Under the artery lies the radial nerve.
- Out between biceps and coracobrachialis is the musculocutaneous nerve, blocked separately.
- Axillary artery Central landmark; compressible, so suits anticoagulated patients
- Median nerve Superficial, between artery and biceps
- Ulnar nerve Toward the inner side, nearer the skin than the artery
- Radial nerve Deep to the artery; needs its own injection
- Musculocutaneous nerve Away from the artery, between biceps and coracobrachialis
Checked against: Barash 9e · Miller 10e
Image: Zhu W et al., The ultrasound-guided selective nerve block in the upper arm: an approach of retaining the motor function in elbow (BMC Anesthesiol 2018; doi:10.1186/s12871-018-0584-7), Fig. 2, CC BY 4.0. Changes: Cropped to sonogram panel B, dropping the probe photo (panel A). Question image: MN, UN, RN and MCN labels with their arrows, the A and V letters and the panel letter B covered with boxes
Infraclavicular brachial plexus
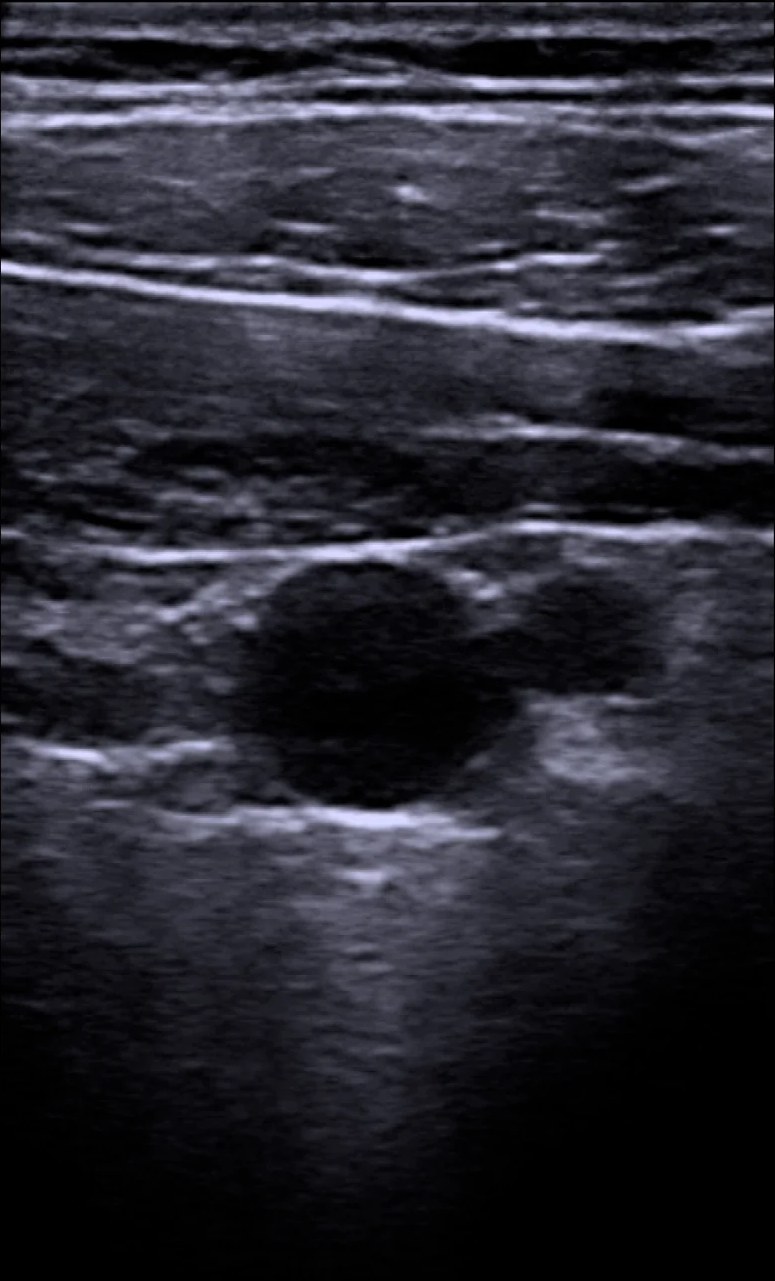
Here is your image. Point to and name each structure, then say why it matters.
Linear or curved 4–7 MHz probe, parasagittal, just medial and below the coracoid (under the outer third of the clavicle).
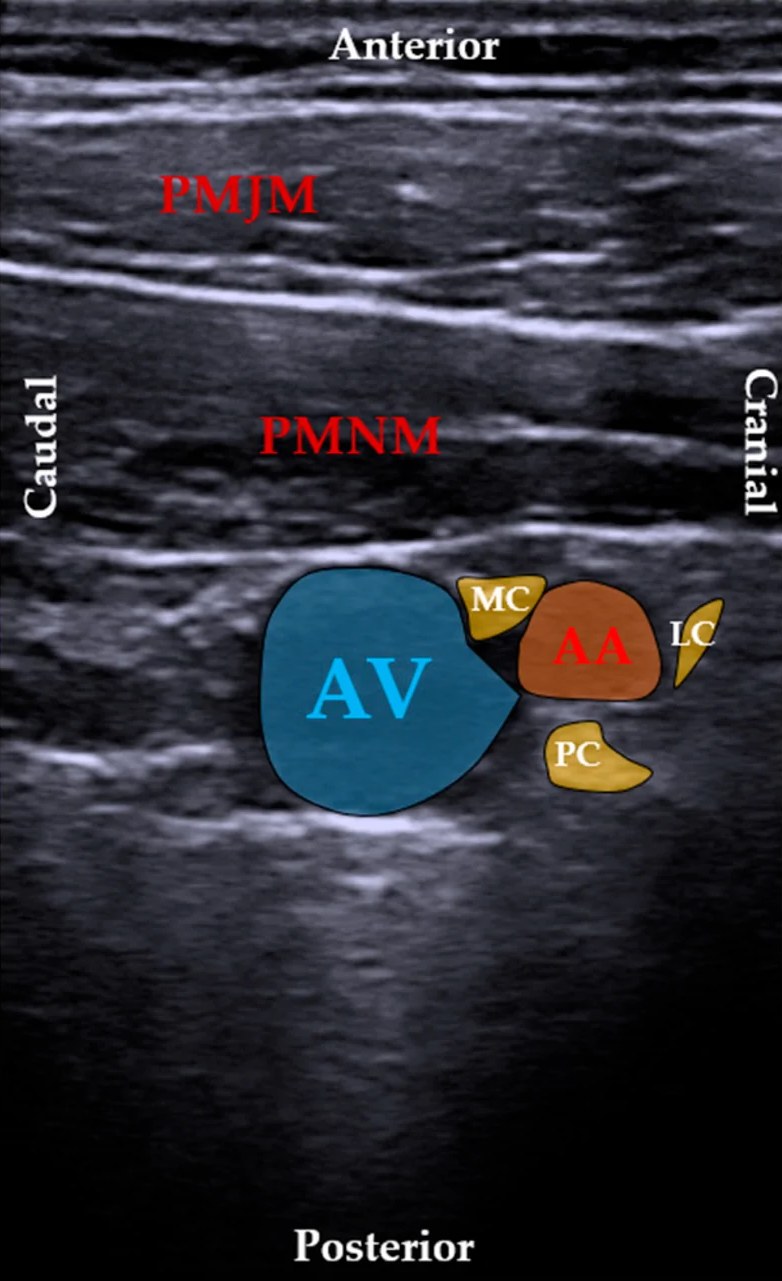
Parasagittal mid-infraclavicular; caudal on the left, cranial on the right, anterior at the top
 , open the image full size
Show the answerHide the answer
 , open the image full size
Labels PMJM pectoralis major · PMNM pectoralis minor · AV axillary vein · AA axillary artery · LC, MC, PC lateral, medial and posterior cords
- These two layers are pectoralis major on top and pectoralis minor below.
- Deep under them is the axillary artery, with the vein medial and lower.
- This bright oval beside the artery is the lateral cord.
- The posterior cord hides behind the artery, so I inject behind the artery.
- Cords look bright here, not dark like up in the neck.
- Pectoralis major and minor Two muscle layers above the bundle; major is the superficial one
- Axillary artery Centre of the bundle, about 4–5 cm deep
- Axillary vein Medial and caudal to the artery: avoid puncture
- Lateral cord Bright oval, the easiest cord to see
- Posterior cord Hidden in artery shadow; injecting behind the artery works best
- Medial cord Sits between artery and vein; position varies a lot
Checked against: Barash 9e · Faust
Image: Petrov PP et al., Bilateral Ultrasonographic Mapping and Morphometry of the Infraclavicular Brachial Plexus: A Prospective Multicenter Study (J Clin Med 2026; doi:10.3390/jcm15176892), Figure 2, CC BY 4.0. Changes: Question = panel A (unannotated twin); answer = panel B with colour overlays and labels; both cropped inside the panel borders, figure letters below the panels dropped.
Interscalene brachial plexus
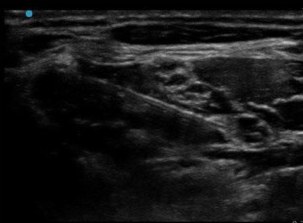
Here is your image. Point to and name each structure, then say why it matters.
Linear high-frequency probe, transverse oblique at cricoid (C6) level, sliding back toward the groove or tracing up from the supraclavicular fossa.
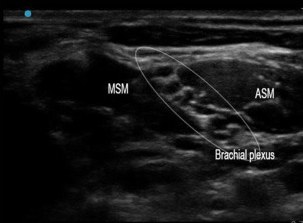
Transverse at the interscalene groove; middle scalene on the left, anterior scalene on the right
 , open the image full size
Show the answerHide the answer
 , open the image full size
Labels MSM middle scalene muscle · ASM anterior scalene muscle · ellipse: brachial plexus
- On top is sternocleidomastoid; the plexus lies underneath it.
- These two muscles are anterior and middle scalene, with the groove between them.
- These dark round dots in the groove are the upper roots or trunks, my target.
- The phrenic nerve rides on anterior scalene, so I expect a one-sided diaphragm palsy.
- Deep and medial sits the vertebral artery, so my needle stays lateral.
- Medially I may see the carotid and jugular, which I avoid.
- Sternocleidomastoid Superficial roof; the plexus sits beneath it
- Phrenic nerve on anterior scalene Blocked almost every time at C6: caution in severe lung disease
- C5–C7 roots/trunks Target: three or more dark round dots in the groove
- Middle scalene In-plane needle crosses it; dorsal scapular and long thoracic nerves inside
- Vertebral artery Medial and deep; keep needle lateral and angled slightly caudal
- Carotid and internal jugular Sometimes visible medially; vessels to keep clear of
Checked against: Barash 9e · Faust · Miller 10e
Image: Mosaffa F et al., Efficacy Comparison Between Interscalene Block with and Without Superficial Cervical Plexus Block for Anesthesia in Clavicle Surgery (Anesth Pain Med 2024; doi:10.5812/aapm-142051), Figure 2, CC BY 4.0. Changes: Question = panel B (unlabelled), answer = panel A (labelled MSM, ASM, ellipse round the brachial plexus); both cropped to the sonogram, dropping the figure letters and the bottom machine button bar.
Lumbar spine for neuraxial block
Here is your image. Point to and name each structure, then say why it matters.
Low-frequency curvilinear probe longitudinal, 2–3 cm off midline tilted toward the canal, then turned transverse over the chosen interspace.
Left panel paramedian sagittal oblique, cephalad on the left; right panel transverse interlaminar, patient's left on the left
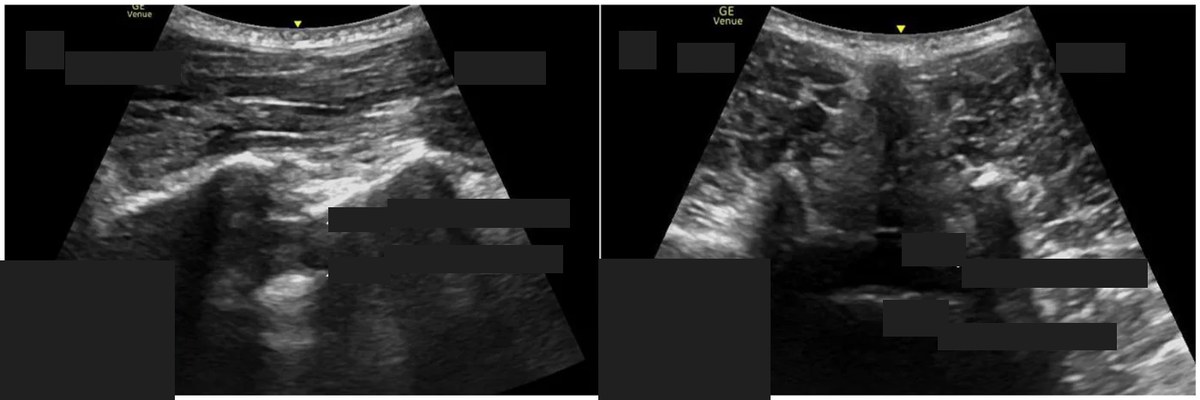 , open the image full size
Show the answerHide the answer
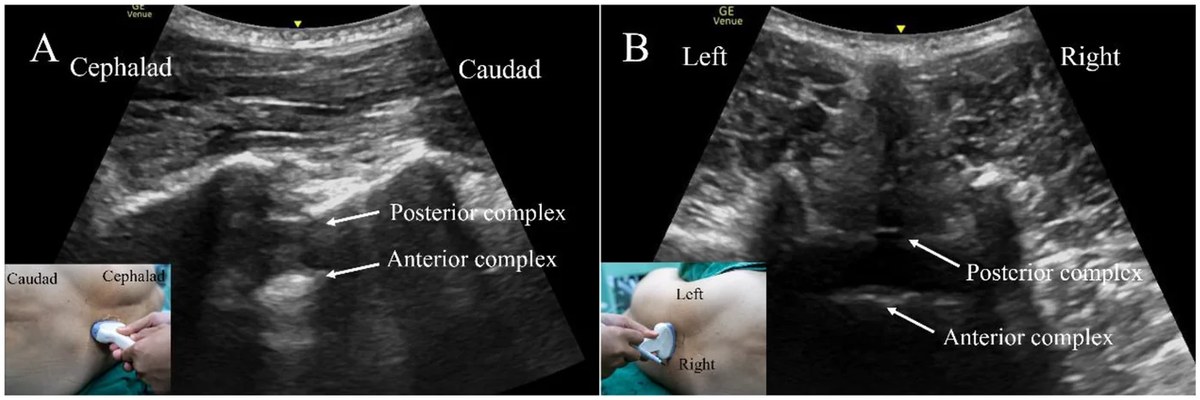 , open the image full size
Labels Posterior complex · anterior complex (arrows)
- Paramedian, this flat bright band is sacrum, so I count up from here.
- These teeth are laminae; the gaps between them are my windows.
- In the window, this upper bright line is ligamentum flavum with dura.
- The deeper line is the front of the canal and vertebral body.
- Turned across, these paired shadows are articular and transverse processes; I mark midline and interspace.
- Sacrum Flat bright band: count levels upward from here
- Laminae Saw-tooth pattern in the paramedian view
- Ligamentum flavum–dorsal dura Posterior complex; measure depth to it
- Anterior complex Deeper bright line: ventral dura and vertebral body
- Articular and transverse processes Paired lateral shadows in the transverse view
- Bone shadow Dark band under bone; windows let the beam through
Checked against: Barash 9e · Miller 10e
Image: Zhuang W et al., Ultrasound-assisted modified paramedian approach vs. traditional paramedian approach for spinal anesthesia in lower limb surgery: a single-center randomized controlled trial (Front Med (Lausanne) 2026; doi:10.3389/fmed.2026.1903864), Figure 1, CC BY 4.0. Changes: Both panels kept, resized to 1200 px wide. Question image: panel letters, the Cephalad/Caudad/Left/Right words, the posterior and anterior complex labels and arrows, and both probe-position inset photos (which carry orientation words) covered with boxes
PENG block
Here is your image. Point to and name each structure, then say why it matters.
Linear probe lying in line with the groin crease and inguinal ligament, spanning ASIS to pubic ramus (corpus says linear, not curvilinear).
PENG view, curvilinear probe transverse-oblique over the iliopubic eminence; medial on the left
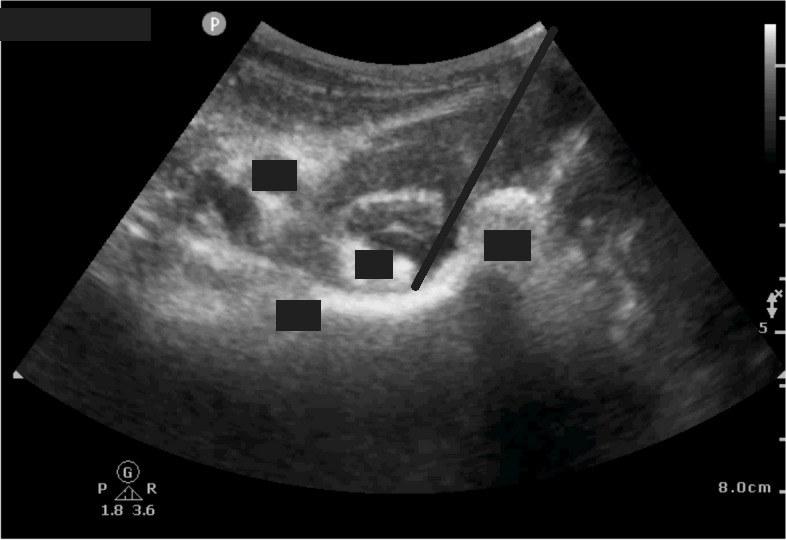 , open the image full size
Show the answerHide the answer
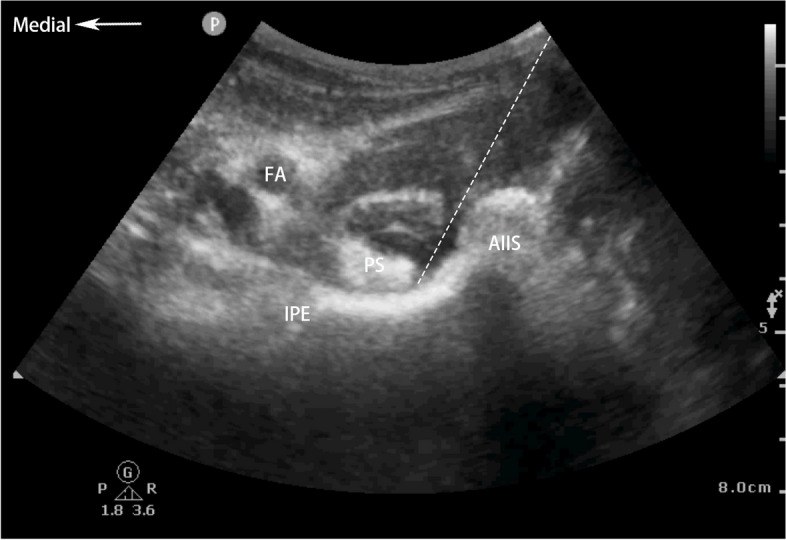 , open the image full size
Labels FA femoral artery · PS psoas tendon · IPE iliopubic eminence · AIIS anterior inferior iliac spine
- Laterally, this bony bump is the anterior inferior iliac spine.
- Medially, this rise of bone is the iliopubic eminence on the pubic ramus.
- This bright band over the bone is the psoas tendon; my tip lands lateral to it.
- This pulsing circle is the femoral artery, so I aspirate first.
- The drug bathes the hip's sensory twigs, while leaving most leg strength intact.
- Anterior inferior iliac spine Lateral bony landmark of the view
- Iliopubic eminence / superior pubic ramus Bone the needle tip contacts, beside the psoas tendon
- Psoas tendon Deposit lateral to it, never inside muscle
- Femoral artery Nearby vessel: aspirate before injecting
- Articular branches (not seen) Femoral, accessory obturator, obturator twigs to the hip: motor-sparing target
Checked against: Miller 10e · Barash 9e
Image: Cui X et al., Effect of pericapsular nerve group block and suprainguinal fascia iliaca block on postoperative analgesia and stress response in elderly patients undergoing hip arthroplasty: a prospective randomized controlled double-blind trial (BMC Anesthesiol 2024; doi:10.1186/s12871-024-02604-8), Fig. 1, CC BY 4.0. Changes: Kept the whole curvilinear sector; in the question image the FA, PS, IPE and AIIS labels, the dashed needle path and the 'Medial' arrow are covered with dark grey.
Sciatic nerve at the popliteal fossa
Here is your image. Point to and name each structure, then say why it matters.
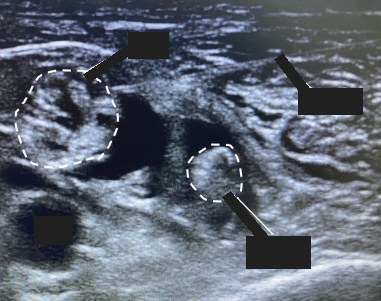
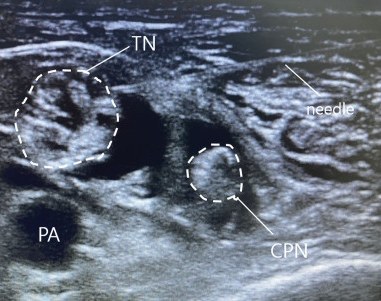
Linear 10–15 MHz probe transverse in the popliteal fossa, starting at the crease and scanning upward.
Transverse at the popliteal fossa, at the bifurcation
 , open the image full size
Show the answerHide the answer
 , open the image full size
Labels TN tibial nerve · CPN common peroneal nerve · PA popliteal artery · needle
- At the crease these pulsing circles are the popliteal vessels.
- Above and lateral to them are the tibial nerve and, furthest out, the common peroneal.
- Scanning up, they merge into this large bright oval, the sciatic nerve.
- This muscle on top is biceps femoris, and deep is the femur.
- I want a doughnut of drug around the nerve just before it divides.
- Popliteal artery and vein Doppler landmark at the crease; nerves lie above and lateral
- Tibial nerve Next to the vessels at the crease; drifts lateral going up
- Common peroneal nerve The most lateral nerve
- Sciatic nerve (junction) Big bright oval; ideal site before the split, 6–10 cm up
- Biceps femoris Lies over the nerves higher in the thigh
- Femur Bright bony border deep in the image
Checked against: Barash 9e
Image: Yoo SW et al., Comparing quality of recovery and satisfaction between spinal anesthesia and nerve block in orthopedic below-knee surgery: A prospective controlled trial (Medicine (Baltimore) 2024; doi:10.1097/md.0000000000037573), Figure 1 (panel A, cropped), CC BY 4.0. Changes: Cropped the figure letter; in the question image the TN, CPN, PA and needle labels and their leader lines are covered; the dashed nerve outlines are kept.
Serratus anterior plane
Here is your image. Point to and name each structure, then say why it matters.
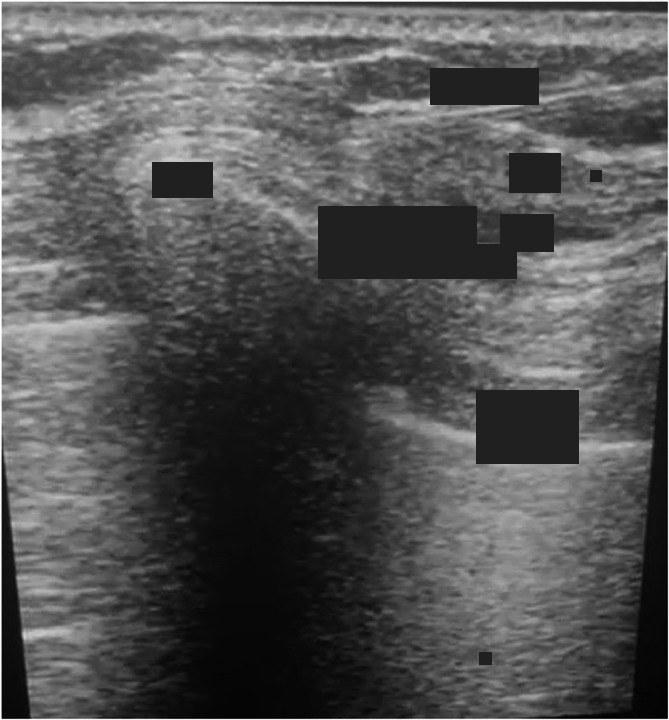
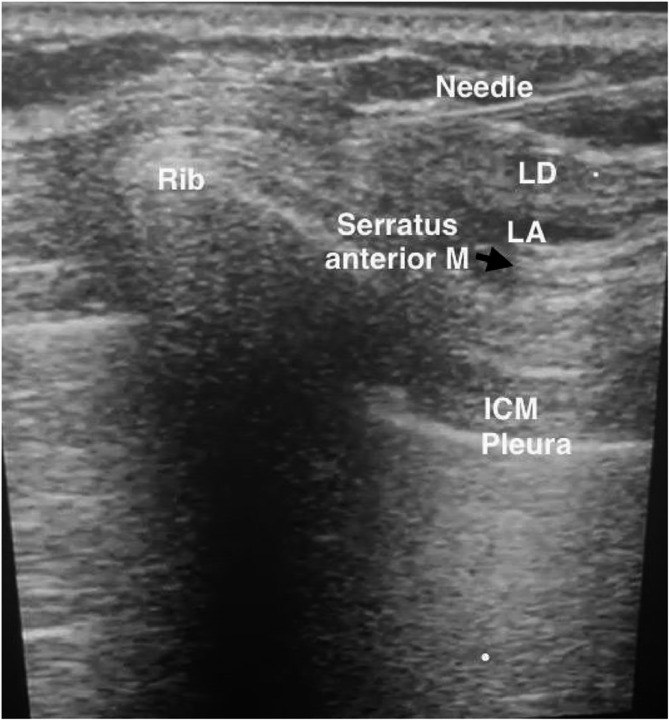
Linear 13–6 MHz probe from the midclavicular line slid down and out to ribs 4–5 at the mid-axillary line.
Orientation not marked; rib and its acoustic shadow on the left, latissimus superficial and pleura deep on the right
 , open the image full size
Show the answerHide the answer
 , open the image full size
Labels LD latissimus dorsi · Serratus anterior M · Rib · LA local anaesthetic · ICM intercostal muscle · Pleura
- At the mid-axillary line, this top muscle is latissimus dorsi.
- Under it, the thin muscle on the ribs is serratus anterior.
- This small vessel between them is the thoracodorsal artery.
- These rib shadows are my backstop, with pleura between them.
- I can inject over or under serratus; spread is similar.
- Latissimus dorsi Top muscle; superficial plane lies beneath it
- Serratus anterior Thin muscle on the ribs; inject above or below
- Thoracodorsal artery Lies between the two muscles; avoid it
- Fourth/fifth rib Bony backstop under the needle
- Pleura Bright line between rib shadows; stay off it
Checked against: Barash 9e · Miller 10e
Image: Abd Ellatif SE et al., Ultrasound-guided modified versus conventional serratus anterior plane block as a preemptive analgesic for unilateral video-assisted thoracoscopic surgery (BMC Anesthesiol 2025; doi:10.1186/s12871-025-03314-5), Fig. 1, CC BY 4.0. Changes: Kept the full sonogram; in the question image the Needle, Rib, LD, LA, 'Serratus anterior M', 'ICM Pleura' labels, the black arrow and two small marker dots are covered with dark grey.
Supraclavicular brachial plexus
Here is your image. Point to and name each structure, then say why it matters.
Linear probe just above and parallel to the clavicle, coronal oblique, slid medially until the subclavian artery is centred.
Transverse (coronal oblique) right supraclavicular fossa; lateral on the left, medial on the right
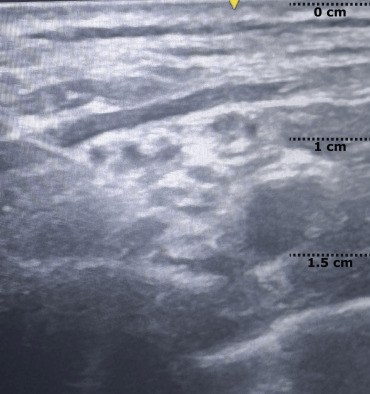 , open the image full size
Show the answerHide the answer
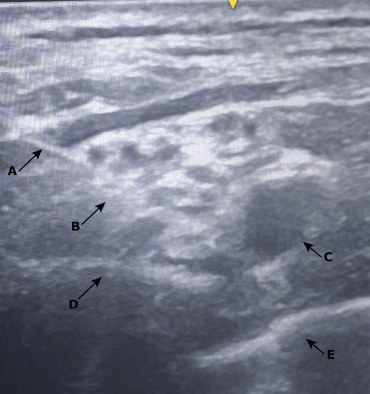 , open the image full size
Labels A needle · B brachial plexus · C subclavian artery · D first rib · E pleura
- This round pulsing circle is the subclavian artery; Doppler confirms it.
- Up and lateral to it is the plexus, a bunch of dark grapes.
- This bright line with a shadow under it is the first rib.
- Next to the rib is pleura; I keep the rib between my needle and lung.
- I aim for the corner beside the artery, sitting on the rib.
- Half or more of these patients get a phrenic block.
- Subclavian artery Round, pulsatile, Doppler-confirmed: the central landmark
- Plexus trunks/divisions Grape cluster superolateral to the artery, above the rib
- First rib Bright line with shadow: the backstop shielding the pleura
- Pleura Pneumothorax is the main risk; rib must cover it
- Subclavian vein Lies inferomedial to the artery; a vessel to avoid
Checked against: Barash 9e · Miller 10e · Faust
Image: Falchetti RG et al., The Anesthetic Management of a Patient With Advanced Heart Failure Undergoing Non-cardiac Surgery (Cureus 2026; doi:10.7759/cureus.103869), Figure 1, CC BY 4.0. Changes: Question = left half (unlabelled twin, depth marks only); answer = right half with arrows A-E. No covering needed.
Thoracic paravertebral and erector spinae
Here is your image. Point to and name each structure, then say why it matters.
Parasagittal along the spine, slid laterally onto the transverse processes; linear 13–6 MHz for ESP, curvilinear for PVB or larger patients.
Transverse-oblique thoracic paravertebral, in-plane; medial on the left, anterior deep
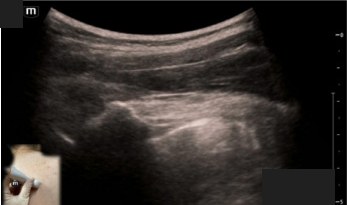 , open the image full size
Show the answerHide the answer
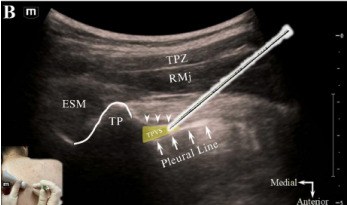 , open the image full size
Labels ESM erector spinae muscle · TP transverse process · TPVS thoracic paravertebral space · RMj rib and ligament junction · pleural line
- With the probe along the spine, these flat square shadows are transverse processes.
- Over them lies erector spinae; for ESP I lift this muscle off the bone.
- Medially the lines overlap as lamina; laterally the round arcs are ribs.
- For paravertebral I pass the costotransverse ligament between two processes.
- This bright line is pleura; a good paravertebral injection pushes it down.
- Erector spinae muscle ESP: drug goes deep to it, lifting it off bone
- Transverse process Flat square shadow; bony backstop for ESP
- Lamina Overlapping lines medially; scan lateral off it
- Rib Deeper rounded arc lateral to the transverse process
- Superior costotransverse ligament PVB needle tip passes just through it
- Parietal pleura PVB injection pushes it down; pneumothorax is the feared harm
- Paravertebral space Deep to the transverse processes, above pleura
Checked against: Barash 9e · Miller 10e
Image: Reeves MT., Thoracic Paravertebral Block for Tube Thoracostomy Analgesia in the Emergency Department: A Case Report (Clin Pract Cases Emerg Med 2025; doi:10.5811/cpcem.47070), Image, CC BY 4.0. Changes: Question = panel A (unlabelled twin), with its figure letter and the Medial/Anterior compass covered; answer = panel B with labels, TP outline, shaded TPVS and drawn needle. Probe-position photo insets kept in both.
Transversus abdominis plane
Here is your image. Point to and name each structure, then say why it matters.
Linear 10–15 MHz probe transverse, started midline then moved to between the costal margin and iliac crest (anterior to mid-axillary line).
Transverse lateral abdominal wall, flank; side not marked
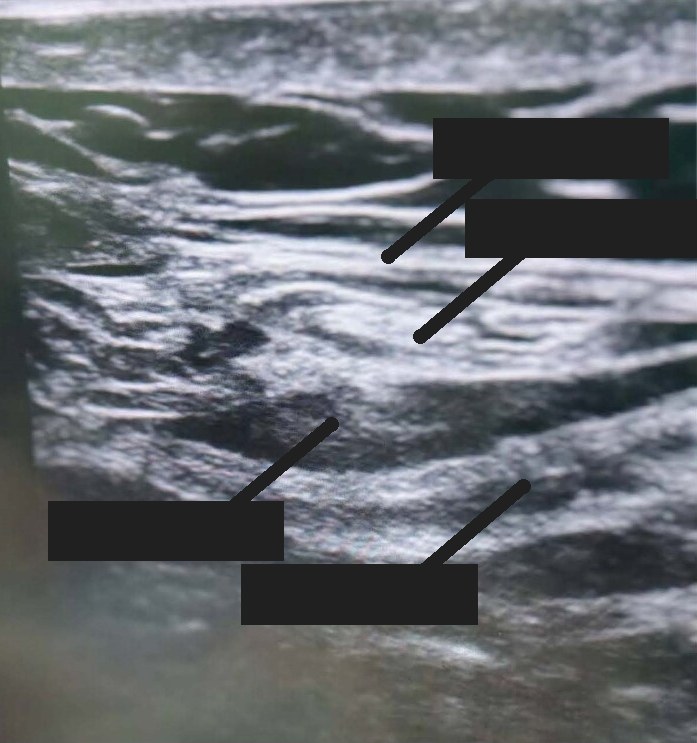 , open the image full size
Show the answerHide the answer
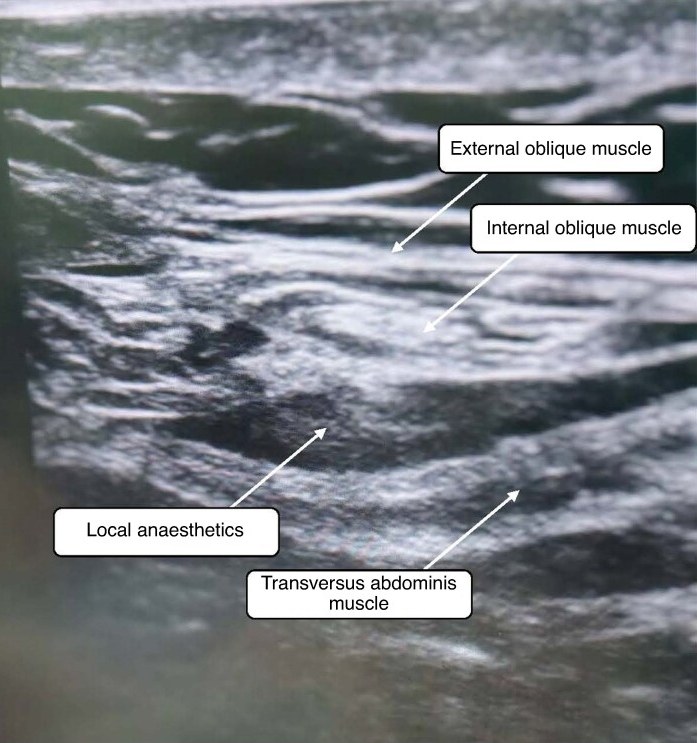 , open the image full size
Labels EO external oblique · IO internal oblique · TA transversus abdominis · LA local anaesthetic
- I start in the middle on rectus, then slide out to the flank.
- From the top down: external oblique, then internal oblique, then transversus abdominis.
- My target is the plane under internal oblique and over transversus.
- This bright line is peritoneum, with moving bowel under it.
- The block numbs the abdominal wall only, not the gut.
- Rectus abdominis Start point in the midline before sliding laterally
- External oblique Top layer of the three
- Internal oblique Middle layer; injection goes under it
- Transversus abdominis Deepest layer; the nerves run above it
- Plane between internal oblique and transversus Target: nerves too small to see, so it is a plane block
- Peritoneum and bowel Bright line below transversus; avoid puncture, watch peristalsis
Checked against: Barash 9e · Miller 10e
Image: Xu H et al., Comparison of postoperative analgesic effects of ultrasound-guided intercostal nerve block and transversus abdominis plane block in patients undergoing laparoscopic cholecystectomy: randomized clinical trial (BJS Open 2025; doi:10.1093/bjsopen/zraf022), Fig. 1, CC BY 4.0. Changes: Trimmed the left screen edge and machine icon; in the question image the four boxed labels and their arrows are covered with dark grey.
Airway and bronchoscopy
Bronchoscopy: bronchial blocker
Here is your image. Point to and name each structure, then say why it matters.
Fibreoptic bronchoscope through the single-lumen tube, viewing from just above the carina.
From above the carina: blocker (yellow shaft) with inflated balloon in the left main bronchus at upper left, open right main bronchus below
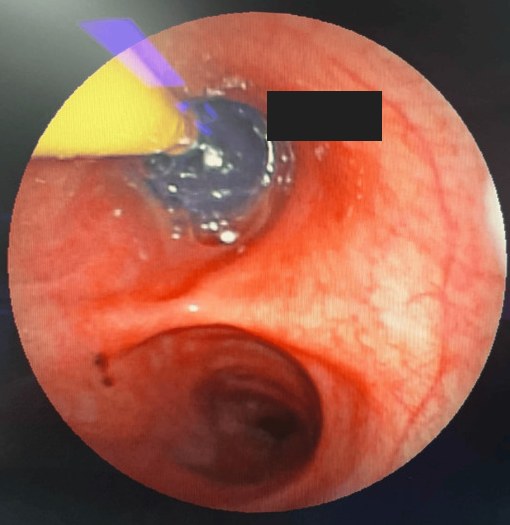 , open the image full size
Show the answerHide the answer
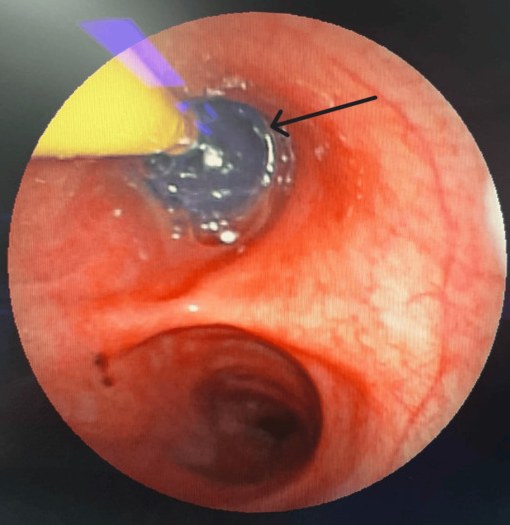 , open the image full size
Labels Arrow: the blocker with its balloon inflated
- From just above the carina, the blocker goes into the chosen main bronchus.
- I inflate the balloon while watching, using only enough to seal.
- The balloon stays below the carina, not bulging into the trachea.
- On the right there is less room because the upper lobe comes off early.
- If it slips into the trachea we cannot ventilate, so I deflate it immediately.
- Main carina Viewed from just above it in the trachea
- Blocker balloon in main bronchus Inflate under vision with least volume that seals
- Balloon edge clear of carina Must not ride up over the carina
- Right-sided placement Upper lobe close by: smaller margin for error
- Dislodged balloon in trachea Blocks both lungs: hypoxia, arrest; deflate at once
Checked against: Miller 10e · Barash 9e
Image: Gupta S et al., Anesthetic Management for the Retrieval of Retained Intrathoracic Foreign Bodies Adjacent to Critical Mediastinal Structures Using One-Lung Ventilation With a Bronchial Blocker: A Report of Two Cases (Cureus 2026; doi:10.7759/cureus.110538), Figure 7, CC BY 4.0. Changes: Cropped to the round scope image. Question image: black arrow covered with a box on the bronchial wall
Bronchoscopy: left double-lumen tube
Here is your image. Point to and name each structure, then say why it matters.
Fibreoptic bronchoscope down the tracheal lumen first, then the bronchial lumen; repeat after repositioning.
Down the tracheal lumen of a left DLT onto the carina; scope rotation not stated
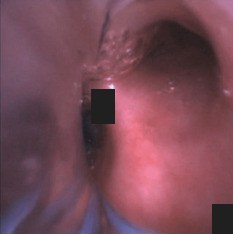 , open the image full size
Show the answerHide the answer
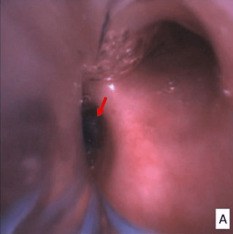 , open the image full size
Labels Arrow: bronchial cuff of the left double-lumen tube in the left main bronchus
- Down the tracheal lumen I see the carina straight ahead.
- The blue cuff edge sits just inside the left bronchus, below the carina.
- It does not bulge over the carina or push it right.
- On the right I find the upper lobe with its three openings.
- Down the bronchial lumen, both left lobar openings are clear.
- I recheck with the scope after every position change.
- Tracheal carina Seen straight ahead down the tracheal lumen
- Blue bronchial cuff edge In left bronchus, about 5–10 mm below carina
- No cuff herniation Bulging cuff can block the right main bronchus
- Right upper lobe take-off Confirms which side you are looking at
- Left upper and lower lobe orifices Down bronchial lumen: both open, none blocked or impacted
Checked against: Miller 10e · Faust · Barash 9e
Image: Tan DJA et al., Difficult Lung Isolation in a Heavy Smoker With a History of Left Lower Lobectomy: A Case Report (Cureus 2024; doi:10.7759/cureus.69388), Figure 2, CC BY 4.0. Changes: Cropped to panel A. Question image: red arrow and panel letter A covered with boxes
Bronchoscopy: right upper lobe
Here is your image. Point to and name each structure, then say why it matters.
Fibreoptic bronchoscope via the tracheal lumen, then through the right DLT's upper-lobe slot.
Inside the right upper lobe bronchus (per caption); scope rotation not stated
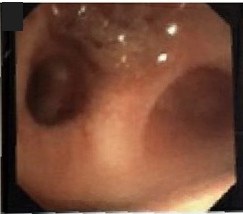 , open the image full size
Show the answerHide the answer
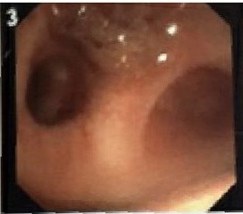 , open the image full size
This image carries no labels of its own; the structures are named below.
Labels Right upper lobe (from the source caption)
- On the right side wall, this opening is the right upper lobe.
- Going in shows three holes, which only this lobe has.
- It starts about two centimetres below the carina, sometimes higher, even off the trachea.
- A right tube's slot must line up here, or the lobe is cut off.
- Right-sided blockers have the same small margin for error.
- Right upper lobe orifice Lateral wall, about 3–4 o'clock, roughly 2 cm below carina
- Three segmental openings Apical, anterior, posterior: unique trifurcation that identifies it
- Anomalous take-off May be under 2.5 cm away or arise from trachea
- Right DLT ventilation slot Must sit over the orifice; margin only 1–8 mm
- Bronchus intermedius Seen beyond the slot through the bronchial lumen
Checked against: Miller 10e · Barash 9e
Image: Knight SE et al., Pigtail catheter found in the Lingula of a pediatric patient on VV-ECMO while performing flexible bronchoscopy: a case report on an unexpected finding (Front Med (Lausanne) 2026; doi:10.3389/fmed.2026.1912185), Figure 2 (image 3, cropped), CC BY 4.0. Changes: Trimmed the frame edge. Question image: panel number '3' covered
Bronchoscopy: the carina
Here is your image. Point to and name each structure, then say why it matters.
Looking down the trachea onto the main carina; scope rotation not stated
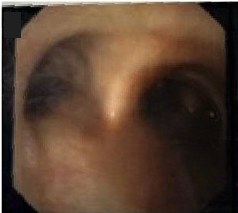 , open the image full size
Show the answerHide the answer
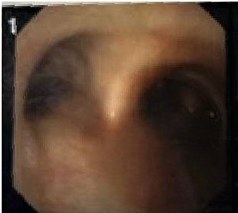 , open the image full size
This image carries no labels of its own; the structures are named below.
Labels The main carina (from the source caption)
- Cartilage rings are in front; the smooth flat wall is at the back.
- This ridge ahead is the main carina.
- The wider, straighter opening is the right main bronchus.
- Just inside it, on the side wall, this hole with three openings is the right upper lobe.
- The other side, longer before it divides, is the left main bronchus.
- Tracheal rings and posterior wall Rings in front, flat membranous wall behind: sets orientation
- Main carina Sharp ridge where the trachea splits
- Right main bronchus Wider, straighter, short before it branches
- Right upper lobe take-off On the right lateral wall, three openings: proves it is right
- Left main bronchus Longer, about 5 cm, before its first split
Checked against: Barash 9e · Miller 10e
Image: Knight SE et al., Pigtail catheter found in the Lingula of a pediatric patient on VV-ECMO while performing flexible bronchoscopy: a case report on an unexpected finding (Front Med (Lausanne) 2026; doi:10.3389/fmed.2026.1912185), Figure 2 (image 1, cropped), CC BY 4.0. Changes: Trimmed the frame edge. Question image: panel number '1' covered
Cricothyroid membrane
Here is your image. Point to and name each structure, then say why it matters.
Midline sagittal over the larynx, neck extended, marked before induction (probe type not given in the corpus).
Transverse at the cricothyroid membrane, anterior at top, midline centred
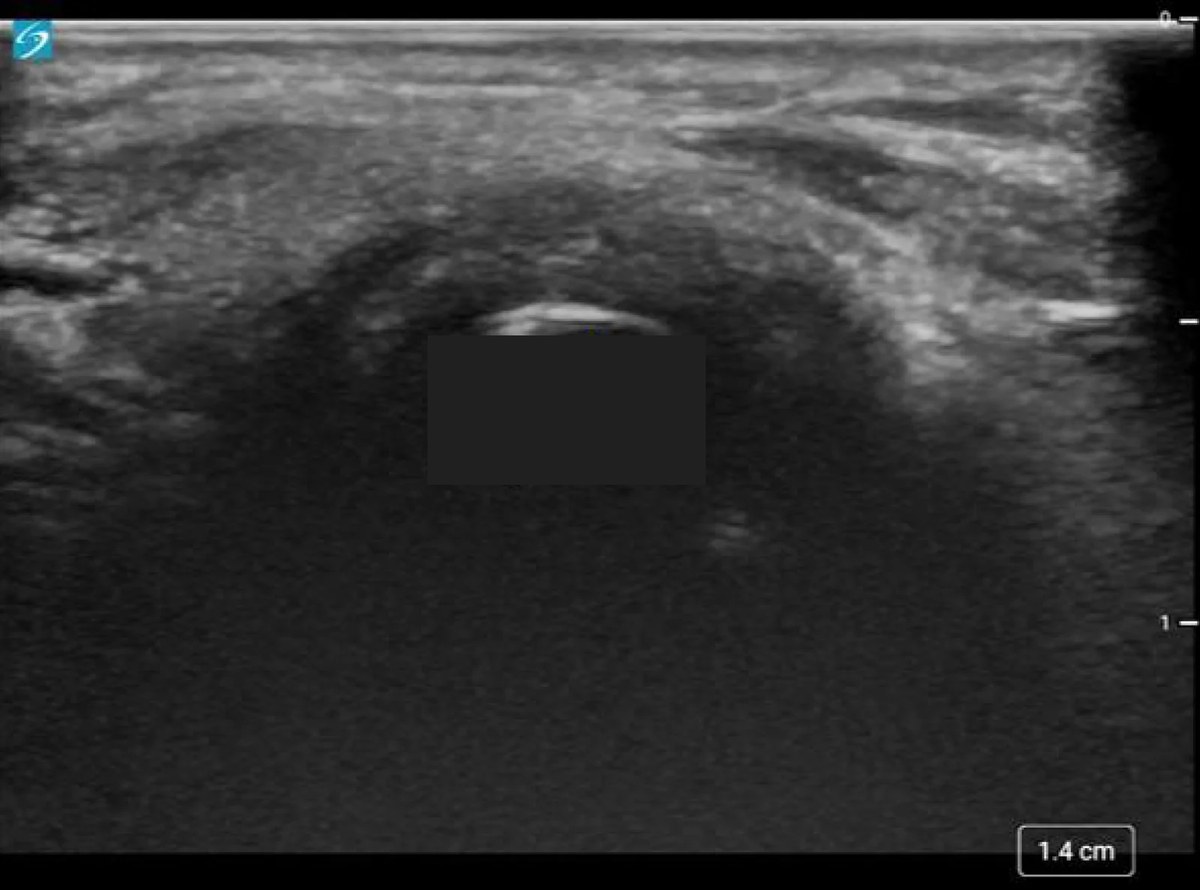 , open the image full size
Show the answerHide the answer
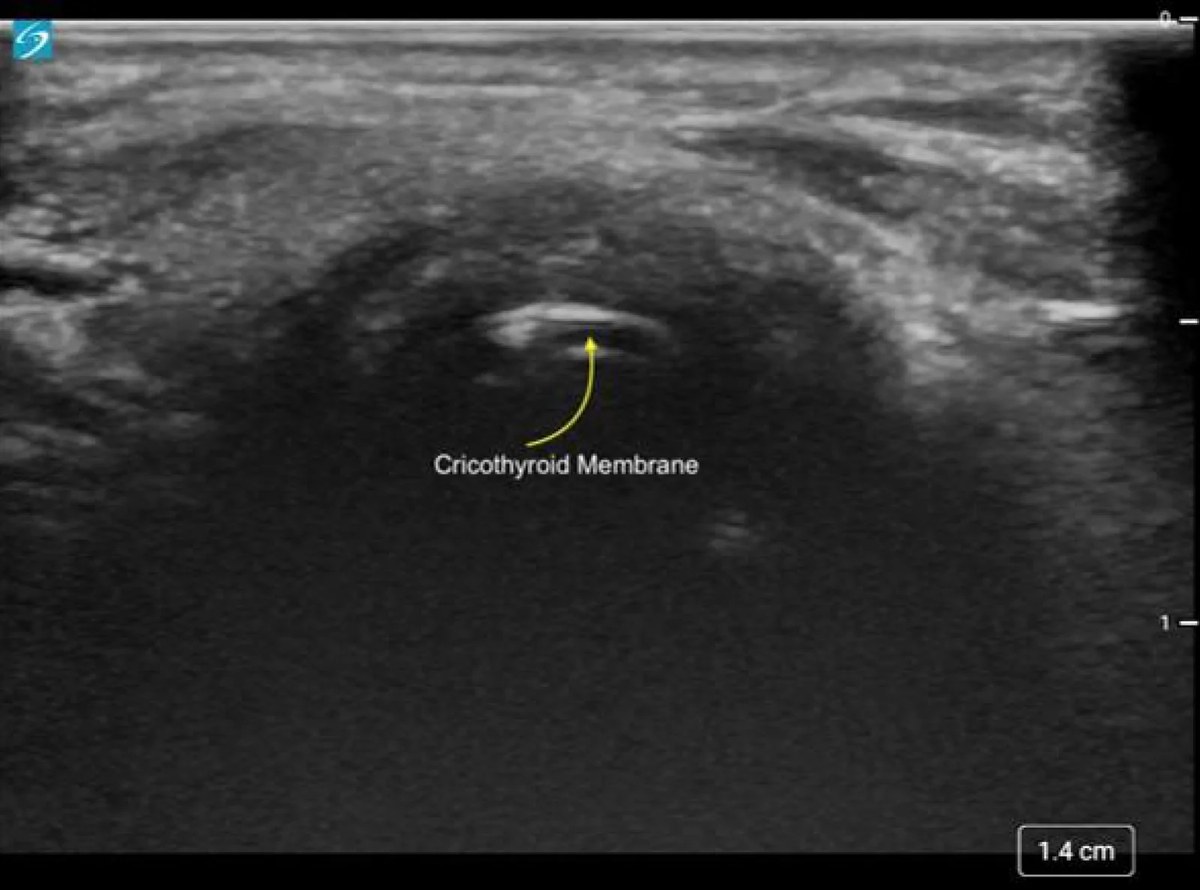 , open the image full size
Labels Arrow: cricothyroid membrane
- With the neck extended, this is thyroid cartilage at the top.
- Below it, this gap is the cricothyroid membrane, my target.
- Next comes cricoid cartilage, then the tracheal rings.
- I mark the membrane before induction, because feeling for it often fails.
- I enter its lower third to keep away from the cords above.
- Thyroid cartilage Upper landmark; membrane sits a finger or so below
- Cricothyroid membrane Target; puncture its lower third, aiming backward
- Cricoid cartilage Ring below; a backward-probing needle hits its rear
- Tracheal rings First ring faces C6; confirms you are below cricoid
Checked against: Barash 9e · DAS 2025
Image: Akhter N et al., Airway Ultrasound: Applications in Pediatric Anesthesiology and Critical Care (J Clin Med Res 2026; doi:10.14740/jocmr6635), Figure 9, CC BY 4.0. Changes: Resized to 1200 px wide. Question image: the yellow arrow and the 'Cricothyroid Membrane' label covered with one box under the membrane line
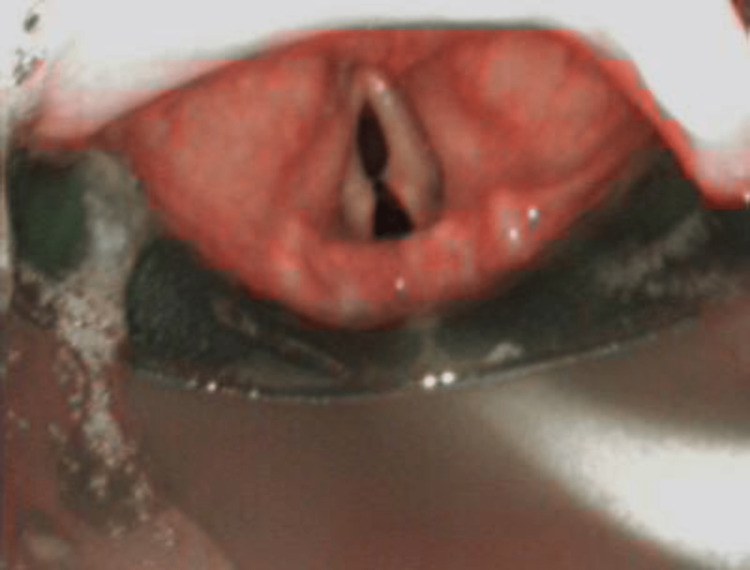
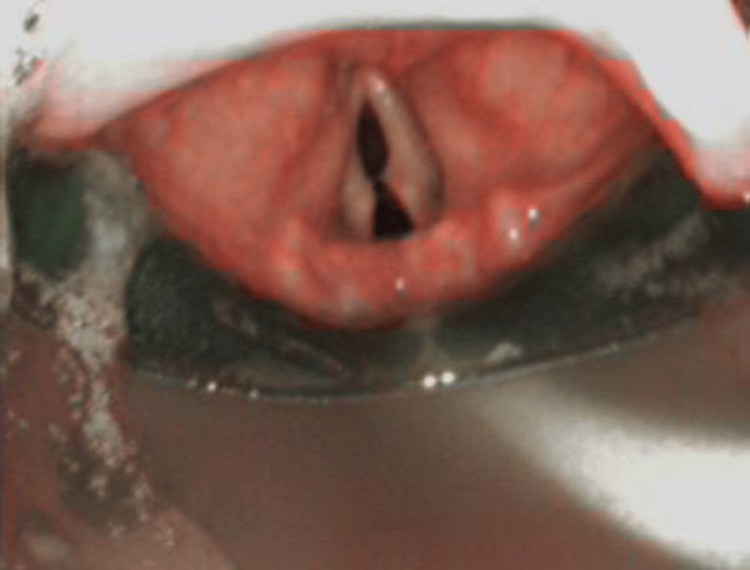
Fibreoptic view through a supraglottic airway
Here is your image. Point to and name each structure, then say why it matters.
Flexible bronchoscope down the SAD's airway tube, with or without an Aintree catheter.
Looking down through the i-gel bowl onto the glottis; device bowl at the bottom
 , open the image full size
Show the answerHide the answer
 , open the image full size
This image carries no labels of its own; the structures are named below.
- One attempt through the SAD, only if the patient is stable and oxygenating.
- Through the scope, this flap is the epiglottis; folded down, I reseat the device.
- On a Fastrach, the bar lifts the epiglottis as the tube leaves the bowl.
- These are the vocal cords; with full relaxation they stay open.
- I watch the tube pass between the cords into the trachea, never going blind.
- Then I confirm with sustained end-tidal carbon dioxide too.
- Bowl aperture and elevating bar (Fastrach) Bar lifts the epiglottis as the tube leaves the bowl
- Epiglottis Folded down it obstructs; up–down manoeuvre can clear it
- Vocal cords Tube must be watched passing between them; relaxant holds them open
- Trachea beyond the cords Tube seen here plus capnography; CO2 alone misses bronchial or pharyngeal tubes
Checked against: DAS 2025 · Barash 9e · Miller 10e
Image: Stagg PL., Bronchoscope-Guided Airway Rescue via an I-gel™ for Haematoma-Induced Airway Obstruction Following Anterior Cervical Spine Surgery (Cureus 2023; doi:10.7759/cureus.34990), Figure 1, CC BY (version as stated at the source). Changes: No labels, so the question and answer images are the same uncropped frame
Vessels, lung and stomach
Gastric antrum
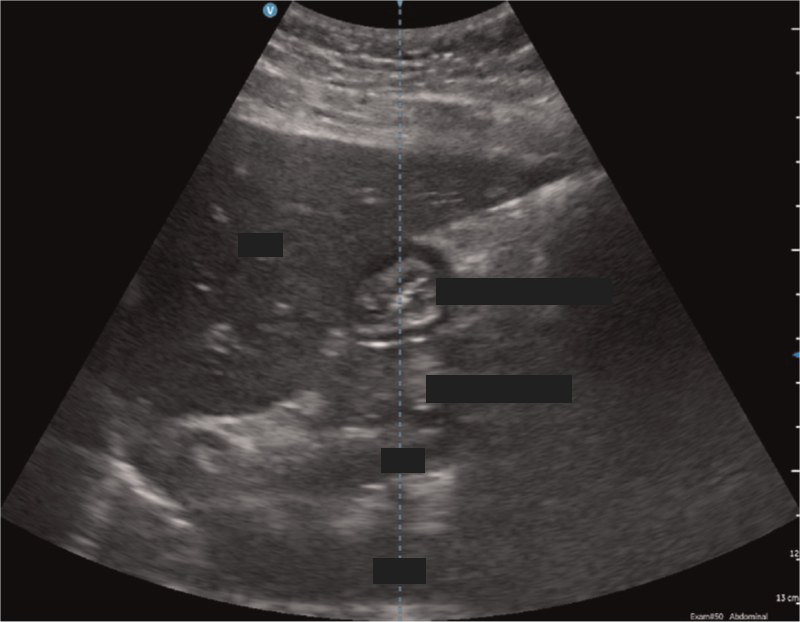
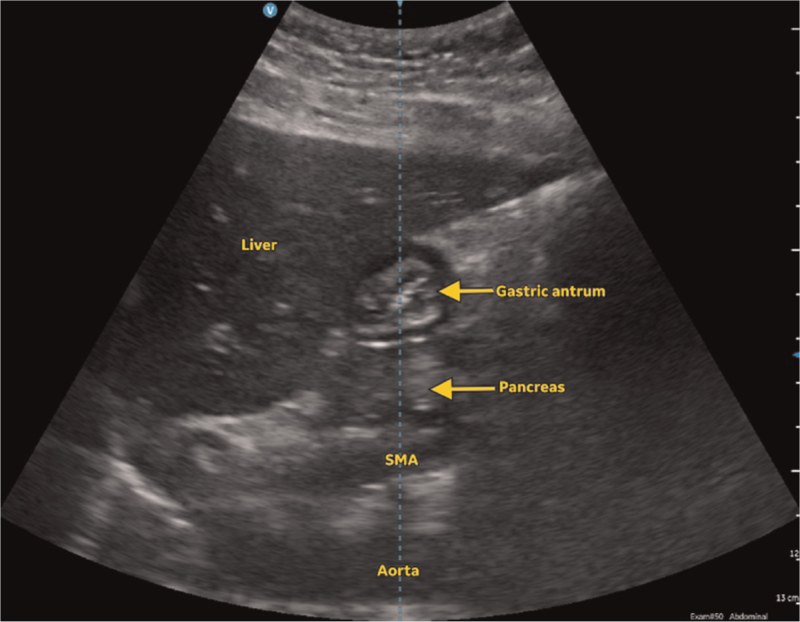
Here is your image. Point to and name each structure, then say why it matters.
Curvilinear low-frequency probe parasagittal in the epigastrium under the left liver lobe, supine then right lateral decubitus.
Sagittal epigastric, cranial on the left, anterior at top
 , open the image full size
Show the answerHide the answer
 , open the image full size
Labels Liver · gastric antrum · pancreas · SMA superior mesenteric artery · aorta
- Under the left liver lobe, this round target is the gastric antrum.
- Deep to it runs the aorta, so I am in the right plane.
- Empty, the antrum is small and flat; here it is distended.
- Dark contents mean clear fluid; a hazy, frosted look means solid food.
- I measure its area on the right side to estimate volume.
- Left lobe of liver Acoustic window lying above the antrum
- Gastric antrum Round target shape that swells as content increases
- Aorta Deep landmark confirming the right plane
- Antral contents Clear fluid dark; thick fluid bright; solids ground-glass
- Antral area in right lateral position Gives volume; solids or above 1.5 mL/kg means full
Checked against: Barash 9e · Miller 10e
Image: Desai N et al., The pregnant and postpartum stomach (Eur J Anaesthesiol 2026; doi:10.1097/eja.0000000000002320), Fig. 2, CC BY 4.0. Changes: Whole image kept, no crop. Question image: yellow Liver, Gastric antrum (with arrow), Pancreas (with arrow), SMA and Aorta labels covered with boxes; the machine centre line is kept
Internal jugular vein and carotid
Here is your image. Point to and name each structure, then say why it matters.
Real-time imaging across the vessel (short axis), or along it as an option (probe type and position not given in the corpus).
Transverse short axis, skin at top; IJV superficial and to the left, common carotid deeper and to the right; side of neck not stated
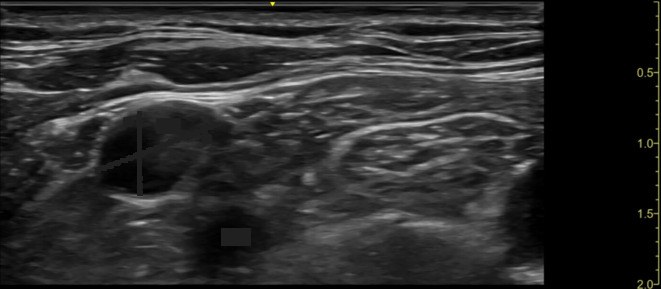 , open the image full size
Show the answerHide the answer
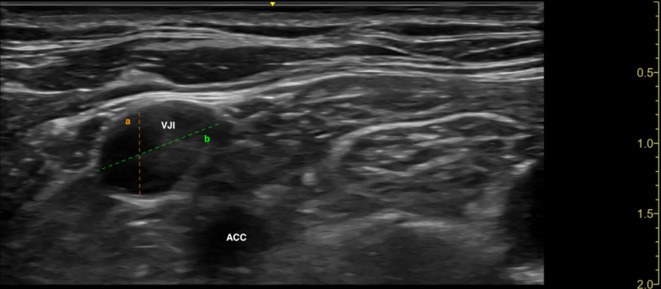 , open the image full size
Labels VJI internal jugular vein · ACC common carotid artery
- I scan before prepping to check the vein is a good size and not clotted.
- This is the internal jugular; the right side is my usual choice.
- This is the carotid, the thing I must not puncture.
- I keep the beam just ahead of the tip until it sits inside the vein.
- Before dilating I check pressure to exclude arterial placement.
- Right internal jugular vein Preferred side: predictable anatomy, reachable from the head end
- Carotid artery Accidental puncture is the classic danger; confirm venous by manometry
- Vein size and patency Pre-scan rules out a small or clotted vein
- Needle tip in lumen Follow the tip ahead of time until it sits mid-vessel
- Back wall of the vein Long-axis view helps avoid going through it
Checked against: Barash 9e · Miller 10e
Image: Kalina M et al., A novel "lateral approach short axis in-plane" technique vs. conventional "short-axis out-of-plane approach" for ultrasound-guided internal jugular vein access: a prospective randomized non-inferiority trial (Ultrasound J 2025; doi:10.1186/s13089-025-00405-9), Fig. 2, CC BY 4.0. Changes: Whole image kept, no crop. Question image: orange and green measurement lines and their 'a'/'b' letters covered with dark grey along the lines; 'VJI' and 'ACC' labels covered with boxes
Lung sliding and pneumothorax
Here is your image. Point to and name each structure, then say why it matters.
Linear, phased-array or curvilinear probe in a head-to-feet orientation across two ribs; depth 4–6 cm for anterior views.
Top: B-mode across the pleura, skin at top, normal lung left of the M-mode cursor and pneumothorax right of it; bottom: M-mode over time, alternating seashore and barcode
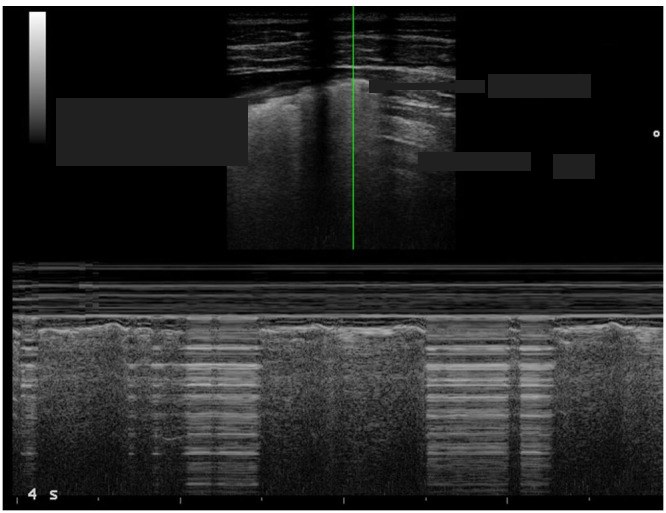 , open the image full size
Show the answerHide the answer
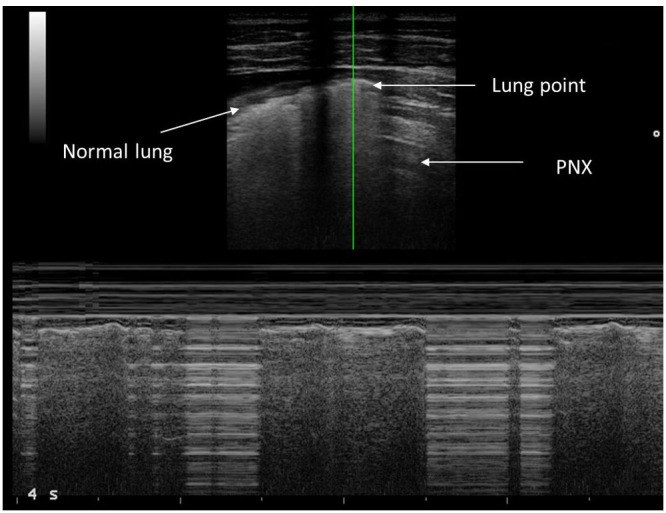 , open the image full size
Labels Normal lung · lung point · PNX pneumothorax
- These two shadows are ribs, and this bright line between them is pleura.
- This shimmer on the pleura is lung sliding, so no pneumothorax here.
- These horizontal copies of the pleural line are A-lines.
- Vertical streaks to the bottom are B-lines; they also exclude pneumothorax.
- On M-mode, sand under the line is normal; stripes all through is barcode.
- Where sliding meets no sliding is the lung point, which confirms pneumothorax.
- Rib shadows Frame the window either side
- Pleural line Bright line just under the ribs; sliding happens here
- Lung sliding (seashore on M-mode) Present means no pneumothorax at that spot
- A-lines Horizontal repeats; dominate when there is a pneumothorax
- B-lines Vertical streaks from pleura; presence rules out pneumothorax there
- Barcode sign No sliding; also seen with one-lung ventilation or adhesions
- Lung point Edge where sliding stops: diagnostic of pneumothorax
Checked against: Barash 9e · Miller 10e
Image: Scialanga B et al., Lung Ultrasound to Detect Pneumothorax in Children Evaluated for Acute Chest Pain in the Emergency Department: An Observational Pilot Study (Front Pediatr 2022; doi:10.3389/fped.2022.812246), Figure 1, CC BY 4.0. Changes: Whole figure kept (B-mode on top, M-mode below). Question image: 'Normal lung', 'Lung point' and 'PNX' labels and their arrows covered with boxes. The lung-point arrow shaft inside the B-mode image is covered with a thin strip